Avastar can import and export shapes from OpenSim or any compatible online world. You find the import/export functions in the Object properties of the Avastar Armature:
- Go to object mode.
- Select the Rig (RMB on the yellow circles around the mesh).
- Open the Properties window.
- Navigate to the “Object” properties.
There you find a panel Avatar Shape IO. This panel displays a Preset selector and a subpanel with 4 main functions:

Load Shape (Import a shape)
This function allows you to upload a Shape that you have previously exported from your online world: In most viewers there is a shape export option hidden in the advanced menu (“Advanced” -> “Character” -> “Charater Tests” -> “Appearance to XML”). This will silently create a file called:
[application_folder]/character/new archetype.xmlThis file contains your current shape and can be loaded into Avastar, where [application_folder] is the viewer’s application data folder. For Windows this folder is located at:
C:\Users\\AppData\Roaming\SecondLife\user_settings\new_archetype.xmlThe XML Shape Importer
The Load Shape tool is good for replacing the current shape of an existing Avastar model, But this is inconvenient when you do not yet have an Avastar in your scene. Here is the use case:
Suppose you start a fresh Project with an empty scene. You already have downloaded your personal Shape from SecondLife as described above. Now you want to create a new Avastar character with exactly this shape.
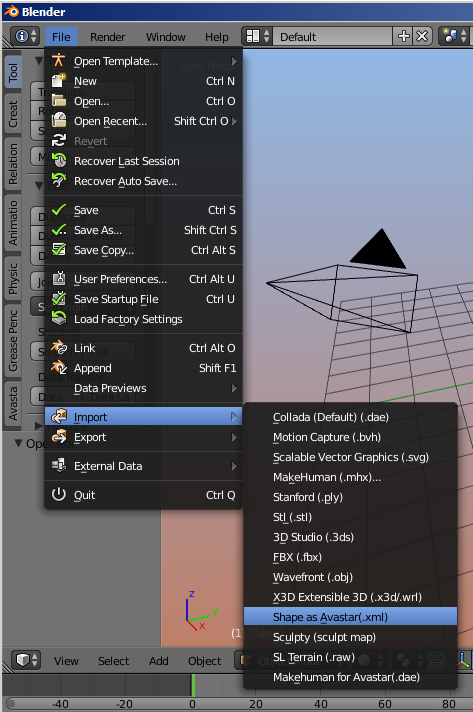
You find the XML Shape importer in the regular Blender Import menu under
File -> Import -> Shape as Avastar
The tool first opens a file selector where you select the XML shape. Then the tool creates a new Avastar character, and finally applies the imported shape.
Save Shape to
As mentioned above the default option is to save to File. But you can also save to a Blender textblock. In that case the slider values can be found in the Blender text editor panel. The values correspond to the shape settings in the SL viewer.[break]
Note: Some viewers support the upload of shape file to SL (e.g. Firestorm, Singularity). To see the file, switch to the Blender Text editor and locate Shape for: Avatar (Avatar stands for the name of the Armature). Useful when you need to update the shape in SL with the values from blender.
Refresh Shape:
This resets the Avastar meshes to the current Shape values. Useful together with the new custom shape key function. Also if you messed up the Avastar meshes (by editing them) you can return the mesh back to the current shape slider values.
Delete Avastar Shapes
Remove all Shapes from the Avastar character. You will want this when you use the rig for non human characters where keeping the Avastar human meshes make no sense.
Load Appearance Sliders
Activating the button loads the appearance setting controls. We added this for optimization purposes as it takes a few seconds to initialize the Avastar shape system.
