Skinning (weighting your mesh)
Skinning is the process of creating an association between a Mesh (the Skin) and a Rig. More specifically in the Skinning process we define associations for each bone of the Rig’s Skeleton to each vertex of a mesh. In practice, for a polygonal mesh character, each bone is associated only with a subset of the character’s vertices.[break] Portions of the character’s skin can be influenced by 2 or more bones, where each vertex of the affected area gets an influence factor to each associated Bone. This factor is also called Vertex Weight. Thus the influence of each bone on a specific Vertex is defined by its Vertex Weight.
The process of Skinning includes:
- Binding the Character to the rig in a specific Pose (basically establishing an association between the Rig and the Mesh)
- Weighting the Mesh to the Armature bones (create the Vertex Weights)
The Skinning Panel
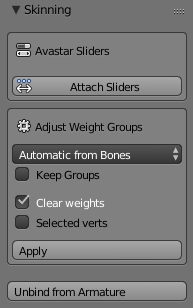
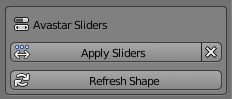
Once you have bound your custom mesh to an Avastar rig, the Skinning panel changes as displayed in the image aside. We now see 3 subsections:
- Avastar Sliders: To attach the selected Custom mesh to the Avastar Slider System
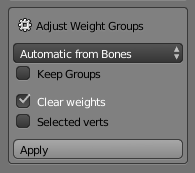
- Adjust Weight Groups: To automatically create weight presets for the selected Custom Mesh
- An Unbind from Armature Button to disconnect the Custom mesh from the Avastar Armature
Avastar Sliders
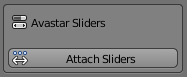
Sliders inactive (not attached to Custom mesh)
When you click on the Attach Sliders Button, then Avastar will generate 2 Shape Keys:
- The Neutral Shape
- The Bone Morph
These 2 Shape keys in combination create the mesh shape that will be used in SL when you wear the custom mesh with the same SL Shape as you use within Avastar.
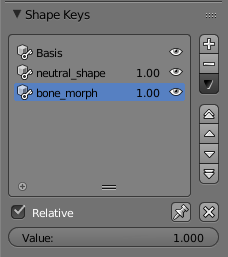
You find the Shape Keys panel in the Custom Mesh Data properties
Note: Avastar’s default Shape is exactly the same as the SL Default shape that you get when you create a new Shape in the SL Viewer.
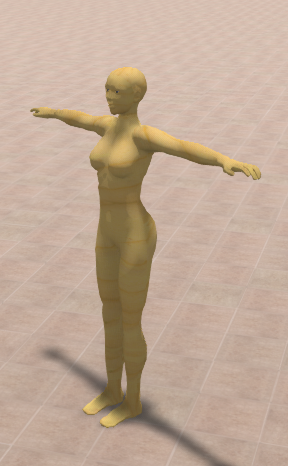
Avastar Default Shape
SL Default Shape
More about Shape keys
We have decided to use shape keys here because this method allows us to modify the Mesh shape in a non destructive way. That means: If you are not satisfied with your changes, then you can detach the custom mesh from the slider System at any time. And you get back your original mesh as it was when you attached it to the sliders. We only need to delete the Shape keys in that case.
Some more details
- The Basis contains your original mesh (as it was when you attached the sliders)
- The Neutral Shape key stores the difference Shape that will convert the Basis into a Mesh for the SL Rest Pose(1).
- The Bone Morph key stores the difference shape that will convert the neutral shape into the final shape as it will be seen in the SL Viewer.[break]
The shape keys work “on top of each other”, that is: First the Basis gets morphed into the Neutral Shape, then the Neutral shape gets morphed into the final Bone Morph Shape (That is why the Relative option is ticked in the Shape keys panel, see image).
Note: If you want to compare Avastar with SL then you have to ensure that you use the exact same shape values in Avastar and in SL. You can export the SL Shape from the SL Viewer and upload it to Avastar, see TODO: link to shape document
(1): The SL Rest pose only exists somewhere deep in the SL Viewer code. You will never actually see it! You can not even configure it in the SL Viewer. However, when you create a new default Shape in SL then this shape is actually exactly the same shape as we use for the Avastar default shape. we often see statements that the Avastar Shape is wrong, but that is just not true. In fact the Avastar Shape is always an accurate replica of the SL shape.
The Apply Sliders Button applies the current Slider settings (the shape keys actually) to the mesh and removes the now no longer needed shape keys. This button changes your Custom mesh on vertex level.
(1): The Refresh shape button only makes sense when Collision Volume Bones are weighted. That is because only Collision Volume Bones are capable to scale the meshes. When there are no Collision Bones marked as Deform Bones (Classic Mesh weighting), then this Button is greyed out to mark it as unneeded.
More about the Refresh shape Button
Now this is rather complicated to explain. The most important point here is that the Bone weight Panels do a lot more than just controlling how the mesh bends when animated. In fact Bone weights are used to apply the entire “Joint Matrix” of the influencing bones to the mesh. That is in simple words, Bone weights can be used to scale your meshes as well.
You might be very astonished about this, because the Avastar Armature does not use Bone scaling at all. Also the default Avatar that you see in the workbench or in avatar.blend does not have Bone Scales (all are set to 1.0). But the SL viewer makes heavy usage of Bone Scaling in its Shape editor.
Now back to Avastar: Avastar does not use Bone scaling like the SL Viewer does, but rather directly scales the Meshes and thus keeps the Bone scaling always at 1.0. So, whenever a slider is modified, Avastar determines the exact Bone Joint matrix for every Bone in the mesh and applies that matrix directly to the mesh and finally resets the Joint matrix to a neutral scale ( 1.0 ). However, we have to take into account that some vertices are controlled by more than one bone. That is where the weight maps come into play again. They simply determine the relative influence of each bone Scale when the influence on a vertex is calculated.
If you do not understand right away what that is, please ignore me here. Or if you are curious about this, then you will want to dive deeper into the principles of Skeletal Animation. Please Google your way to the knowledge in this case. We currently do not have tutorials about this topic.
Why we apply the Scales to the Mesh
Applying the Bone Scales has one remarkable benefit, that is when you reset your Rig to rest pose, you will not loose the current Slider settings because these settings have been stored within the Shape keys of your custom Meshes (and within the Avastar Meshes them self for the Avastar Dummy character).
And what is the Gotcha please ?
When the weights are modified, then Avastar needs to apply the modified weights to the mesh as well. So modifying the Sliders and modifying the Weights of your mesh both influence the shape of your mesh (also in Rest Pose!) . And hence any change of your weight maps needs to be propagated to the Mesh as well.
But these calculations are expensive. Because of this we do not propagate any change of the weights immediately to the mesh. Instead of this we provide the Refresh shape Button. So you would do some changes on your weight maps and then hit the Refresh shape Button to see how the mesh shape changed. then return back to modify the weights, and hit the Refresh button again, and so on …
Note: There is a keyboard shortcut ( ALT +Q )that you can use instead of clicking the Refresh Shape Button.
Adjust Weight Groups
A Gentle reminder
Especially when you try to copy weights from other meshes you have to refine the weights manually in almost every case. All that you can achieve is to get a starting point for your work. This may work nicely, or not.
If you are trying out the Fitted Mesh Weighting, then we recommend to avoid using the default Avatar weights. Please consider to use Automatic Weight from Bones instead. That gives better results in many cases. Blindly using the weights from the default Avatar never works!
The example below shows 3 identical meshes: The left mesh is weighted to the classic mBones, the right mesh is weighted to the Collision Volumes (cBones) using the same weight values.
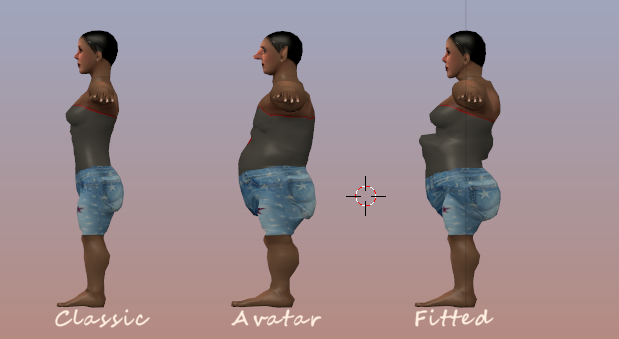
The character in the center gets the full treatment of mBone weights plus mesh deforms (shape keys). Thus this character is equivalent to the default Avatar in SL using the same Gnome shape.
For Fitted Mesh (Collision Volume Bone weighting) you can get much better results when you hand optimize the weights.
Panel Properties
- Keep Groups
- Clear weights
- Selected verts
- Interpolate
- Weights from Avastar (selection table)
- Keep Groups
- Clear weights
- Selected verts
- Interpolate
- Keep Groups
- Clear weights
- Selected verts
Move Weight Groups: Depending on the SL Rigging Style:
- for Classic Rig: If there are Weights Groups available for Collision Volume Bones, then these weight groups are moved to the corresponding SL Base Bone’s weight groups.
- for Fitted Mesh Rig: If there are Weight Groups available for the SL Base Bones, then these weight groups are moved to the corresponding Collision Volume Bone’s weight groups.
- Keep Groups
- Clear weights
- Selected verts
The weight Generator Options
- Keep Groups: When during the copy process some previously existing weight groups get empty, they will be deleted by default. If this option is set, all empty weight groups will be kept.
- Clear weights: Normally the weight copy is additive, that is, when Weights already exist in the Target mesh, then weights which are not copied from the source but wexist in the target will be kept. When this option is set, the source weight groups will be cleaned before the copy takes place.
- Selected verts: Normally the weight Copy copies the entire weight groups. when this option is set, then only weights for the selected verts (in the target meshes) will be replaces or added.
- Interpolate: Normally weights are copied from the source meshes by determining the closest vertex to the destination mesh. When this option is enabled, then weights are interpolated from neighboring source verts as well. This can give smoother results at times.
- Weights from Avastar: (Only available when Copy from Avastar is set as weight source) You can specify exactly which Avastar meshes shall contribute in the weight copy.