Editing the Weight Maps
In the following we try to improve the skirt’s animation. And while fixing the various parts of the mesh, we will introduce a couple of helpful tools for the task.
Fixing the Waist
When we scrub along the timeline, then we see immediately that the waist should not move along with legs. Instead it should be glued to the Avatar’s waist. And Avastar provides a tool for this:
The weight copy tool
- Ensure you are in Edit mode.
- Select the 2 top edge loops of the skirt (ensure that only the top edge loops are selected)!
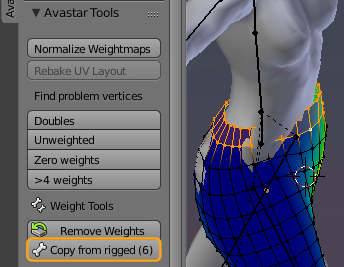
- In the Tool Shelf locate the function “Copy from Rigged” in the Avastar Tools Panel.
Note: This function only affects the selected vertices. So you can be sure that only the 2 upper edge loops of the skirt get modified.
Note: When you work in weight paint mode, and you are in a selection mask mode, then the tool transfers weights only to the selected verts. otherwise the tool will copy the source weights to all vertices of the target mesh.
Technical Details of the Weight Copy Tool
In the yellow box on the image above you can see that actually the weights are gathered from 6 other meshes. These other meshes are the “sources” of the weight copy.
Please be aware that the tool only uses meshes which are rigged to the same Armature as the skirt! With other words, the tool can not copy weights from meshes which are rigged to another armature or not rigged at all.
The weight copy function does a projection copy of the weights from the source meshes to the target vertices.
The Copy weights Operator Panel
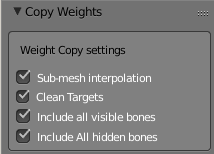
As soon as you have clicked on the button, another box opens at the bottom of the Tool shelf. This is the operator panel for the just called Copy weights function, and you want to enable all 3 available options:
- Sub-mesh interpolation: for calculating a better approximation of the transferred weights.
- Include All visible bones and
- Include All hidden bones: to get the best weights to match as close as possible to the SL Avatar.
- Clean Targets: Remove the weights for the selected verts before doing the Weight Copy(1).
Now the 2 top edge loops of the skirt should move almost like the Avatar mesh does. In our case that is: the selected verts no longer move with the legs. You can verify this by scrubbing along the timeline.
(1):If you select this option, then the weight groups are cleaned up from any previous weights. So you can be sure that your weight copy operates on a clean target. If you unselect the otion, then all weights remain intact for which no new weights are copied over. You can use this when you do partial weight copies for different areas of your mesh.
When all is done…
The skirt’s top edge loops apparently have been “glued” to the avatar body as we wanted:
After fixing the top edge loops, the next loop needs blending
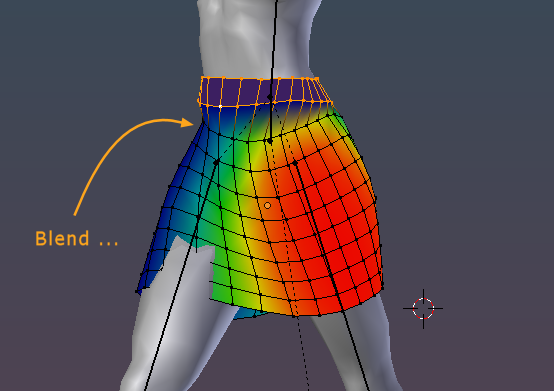
However we realize quickly that fixing the 2 top edge loops gives us an ugly stepping in the 3rd edge loop. This becomes even more apparent when we scrub over the timeline again. But there is an easy fix for this, the Blend tool.
Blending
The Blend tool is part of blender’s native weight tools. You find it in the Tools Sidebar and there in the Weight Tools Panel. The tool works on each selected vertex by searching all its adjacent unselected vertices, then it averages the weights of the boundary verts and applies them. Thus if used with care, then you can get a nice blending of the weights.
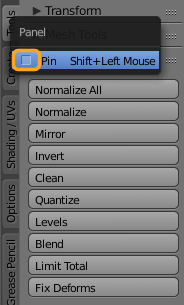
Tip: Pin Blender's Weight Tools for easy access
Sometimes we would like to get some tools displayed along each other, but unfortunately they are located on different vertical tabs. But fortunately Blender allows us to display tool panels in multiple vertical tabs. We can use this feature to get Blender’s Weight Tools and Avastar’s weight tools to show close to each other:
Pinning the weight Tools
- Ensure you are in Edit mode!
- Open the Tool shelf (type “t”).
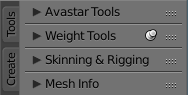
- Open Blender’s vertical Tools Tab.
- Locate the Weight tools Panel and Pin it by RMB click on the Panel name, then enable the Pin option(1).
- Now step back to the vertical Avastar tab.
- Then arrange the Pinned weight Tools below the Avastar Tools:
Now you can open both panels and you have all tools all at one place.
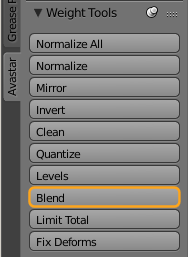
We use the blend tool as follows:
- Select the 3rd Edge loop which we now want to adjust.
- Open the Tool shelf and enter the Avastar vertical tab.
- Open Blender’s pinned Tools Tab (1).
- Now call the Blend tool.
(1): If you need to know how to pin the Blender Weight Tools Box then see the Tip above.
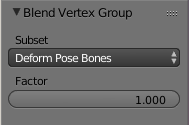
In the operator panel (at the bottom of the Tool Shelf) you now find 2 options:
- Subset: you want to select Deform Pose Bones. This will average all weights such that the transition to the adjacent edge loops becomes smooth.
- Factor: is actually the strength of the smoothing. You may want to play with that value.
You can proceed by selecting the next lower edge loop and apply the blend tool again, but use a smaller blend factor. I tried it for 3 adjacent edge loops by applying the Blend tool 3 times with different blend factors:
- Loop 3: factor = 1.0 (see image)
- Loop 4: factor = 0.6
- Loop 5: factor = 0.3
The final result is shown in the next image below.
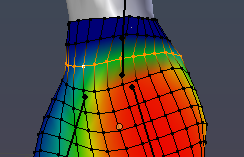
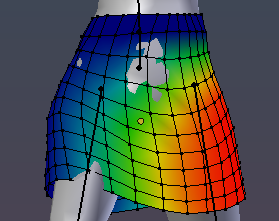
After applying Blend to Loop 3
Cleaning minor issues
The top part of our mesh already behaves quiet nice. On the image you see the result after i have applied the Blend tool to the edge loops 3, 4 and 5 (counted from the top of the skirt).
However we find some small spots with poke through (see center of the pink ellipse ) such issues can simply be fixed by adjusting the mesh itself.
Trying to do this with optimizing your weights will often end in a desaster. So just grab the verts near the problem zone and adjust them slightly.

The Butt
On first sight the Butt looks ugly (when you move the timeline to frame 30 in our case). However, besides the Poke through the mesh behaves rather nicely. So we have 3 options here:
- We keep the weights as they are and use an Alpha mask to get rid of the poke through. This is the most efficient method (and thus the recommended method) to fix this.
- Go the long way and try to fix this by adjusting the weights. This is a challenge, although you can do it rather quickly.
- Just edit the skirt mesh until the poke through goes away.
Although this is somewhat tedious we will try to use the Weights editor to fix this. But i warn you this is… work!
The vertex weights editor
Sometimes you really want to fix the weights of just one single vertex by typing numbers. Although this is a tedious task, it is actually also very powerful because you can adjust your animation up to the smallest details:
- Open the properties sidebar of the viewport (by typing “n” on the keyboard).
- Select one of the verts which you want to fix.
Now you can edit the weights in the Vertex weight editor by either typing the numbers, or dragging the values by using the LMB.
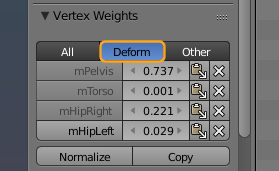
Note: The mHipLeft weight group is displayed on the mesh. Display another weight group by clicking on its name in the list. The Deform button enables a filter that shows only weight groups of deform bones.
About weight pollution
You see that the selected vertex has 4 weights. And 2 of these weights are very close to 0. While this is in most cases not a big problem, this can occasionally cause some headache because it may become possible that far away bones influence mesh areas just a tiny bit. But they might not be supposed to influence the mesh in that way and add small or sometimes even quiet visible distortions.
Also with each additional Weight the mesh movement becomes much more complex and unpredictable. So it is in general a good idea to have as few weights as possible to avoid clutter of any form. And just in the case you do not yet know: SL supports no more than 4 weights on each vertex. It is not defined what SL does when you ignore this limitation. Although Avastar fixes this automatically for you during export of a rigged mesh, you should keep the control and keep this restriction in mind during your weighting.
Cleaning weights
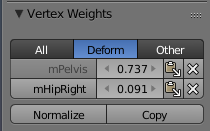
How many weights on a vertex?
The Classic case
In almost every case having more than 2 weights on a vertex is a good way to get into trouble. Of course sometimes you really need to use more weights, but actually it appears to me that you should avoid this as much as possible.
a good example …
Believe me or not, but the SL default Avatar has been constructed rather nicely regarding this rule. You find only verts with one single weight (grey areas) or 2 weights (green areas) and we find no vertex with more than 2 weights.
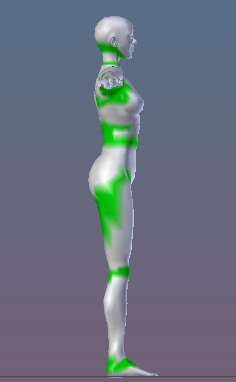
White: 1 weight, Green: 2 weights