Inspecting the Weight Maps
Lets say you have generated the Weights for your mesh during the binding step above (you used Bones as weight source). Blender does a rather good job on automatically determining the weights. However the results are sometimes not yet perfect. Hence the very first thing that you must do now is to check if the Mesh behaves well and follows the animation of the armature. Here are a few tips for getting started.
Inspecting Weights in Edit mode
We have many ways to inspect the weight maps. I believe this one is the easiest method:
- Select your mesh.
- Enter Edit Mode.
- Open the Properties sidebar (type “n”).
- Enable Show Weights.
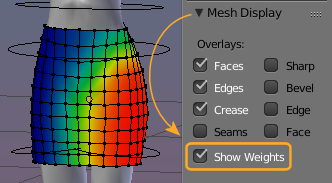
Enable display of weight maps in edit mode from the properties sidebar
- Open the Object data Properties.
- Navigate to the Vertex Groups list.
Now you can scroll through the list of vertex groups and you instantly see the current weight group displayed on your mesh. In the image i have selected the mPelvis weight group, thus the weight map display changes on the skirt.
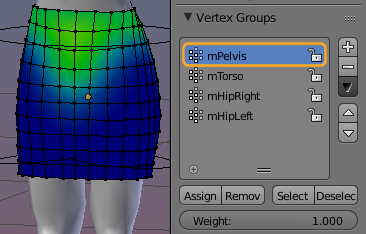
The selected weight Map is shown on the mesh
Inspecting Weights in Weight Paint mode
In edit mode it is not possible to pose the mesh while inspecting the weights. However, since posing the character is very often needed to find bad weights, Blender has implemented select and move bones when the Mesh is in Weight Paint Mode
- Switch your mesh to Object Mode.
- In the Tool Shelf (Avastar Tab) locate the “Show Bones” Section (in the Skinning & Rigging panel).
- Select the “Skin” Preset:
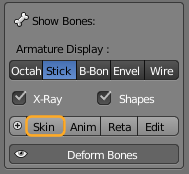
The Mesh after the “Skin” Preset is selected
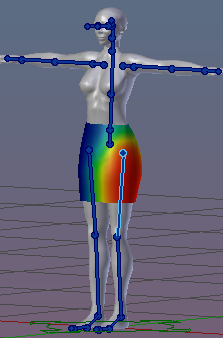
When you now select an mBone (blue) Blender also switches to the corresponding weight map.
Using a Pose for Inspection
While in Weight Paint mode, you can also Pose the mBones. But beware: Avastar’s mBones can only be rotated! they can not be moved.
So this mode is not very useful for creating poses for your mesh. But it is good for quickly testing how rotating a single bone will affect the mesh
Note: For our purpose it is sufficient to have the Hip bones rotated by +/- 25°. I also rotated both lower legs back by 25°. This gives a good test pose that is good enough for inspecting where the weights need to be fixed.
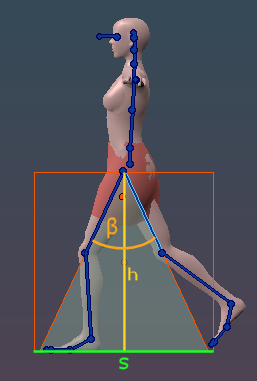
fast walk:
(h)eight == (s)tep length
β == 50°
Details: The right Step Length
Of course there is no single true answer to this. However i found the following works pretty well for human characters (with the proportions of the default SL Avatar):
- For a running walk cycle the maximum distance between the feet is approximately equal to 1.5*length of the legs (that is a very fast running though). This translates to about β=75° for the maximum angle between the legs (see image above).
- For a fast (energetic) walk the maximum distance between the feet is approximately equal to the length of the legs. That translates to about β=50° for the maximum angle between the legs.
- For a slow walk (and for a fashion walks as well) the maximum distance between the feet is approximately about half the length of the legs. And that translates to a maximum angle of about β=30° between the legs.
Of course when you are working on a Ballet tutu then you may need to test much higher angles as well. So, you see, there is no one fits all answer. But for our purpose a maximum angle of 50° between the legs should be working very well.
Advanced Tip: Create a walk animation for testing
Here is a nice little trick that can help you a lot while you are weighting your model. The key idea is to create a very basic animation cycle that contains the extreme positions that you plan to support. Then use the timeline to scrub repeatedly over your animation to check your weighting.
This approach has a few very cool benefits:
- Your poses are well defined: So you can step to a certain time frame and get the pose for that frame. Thus you can quickly check how a certain change in the weights influences other poses.
- You can “see” your mesh in action: So you can check if the mesh transitions work as anticipated.
- You can change the pose in context: So you even can now work and keep in Edit mode all the time. When you need to change a bone position, then just scrub on the Timeline without leaving Edit mode.
- You can play the timeline: thus you can even edit your mesh while the animation runs.
The Timeline Copy Tool
Sparkles provides a function which can be used for quickly making simple Animation cycles. here is the tool manual page:
Advanced Tip: Importing an animation for testing
Tip: Apply weights in edit mode
Apply weights in edit mode
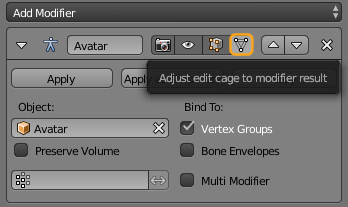
I have shown you before that you can inspect weights in edit mode. However we realize quickly that although the weights are displayed perfectly, the mesh does not behave as expected. It looks like the armature does not influence the mesh in edit mode.
This is because the Armature modifier has an option for Adjust Edit Cage to Modifier Result(1). This option is off by default. So we have to enable it:
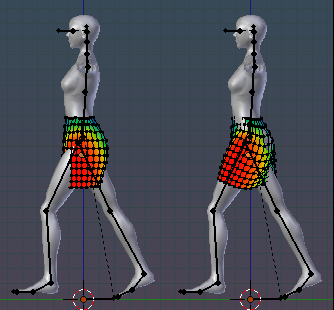
left: Edit Cage not adjusted
right:Edit Cage adjusted
As soon as the modifier option is set, the mesh will follow the pose exactly like it does in Weight Paint mode.
(1): In simple words the Edit Cage is the raw mesh, without any modifier applied and with no constraints applied. Actually the edit cage may look quiet different from the final mesh. The Adjust Edit Cage to Modifier Result applies the current modifier’s influence on the mesh to the edit cage. Thus when this option is enabled the edited Mesh will look like the final rendered mesh, although you only can edit the raw vertices of the Mesh at any time.
I assume that you have added a simple walk cycle as i explained in the Advanced Tip above: Testing by scrubbing (see above) And you have prepared the timeline accordingly. However if you find the creation of the walk cycle is too much for a first try, then you always can move the bones manually as well instead of scrubbing along the timeline.