About this Document...
Content:
- Convert a classic rig to a Fitted mesh rig
- Use the smooth by weight tool
- Edit the Fitted Mesh weights
- Advanced: Basic Theory of Fitted mes
The Video
- Create a Character.
- Use the Shape sliders.
- Use the Collada Exporter.
Rigged Meshes have one nasty problem: They can not be fully adjusted to the user’s shape. When you weight only to the classic mBones then actually only a few of the Appearance sliders (the bone length changing sliders) can be used.
However you additionally can weight a mesh to another subset of the SL Avatar skeleton, namely the Collision Volume Bones. Meshes with weights on the Collision Volume Bones are also named Fitted Mesh…
What does Avastar provide?
Avastar basically supports the creation of animatable Models (Avatars&attachments) and the creation of animations. Therefore the tool adds various functions and user interface elements to Blender.
The full functionality of Avastar can be a bit overwhelming on first sight. You should be prepared to spend some time and patience to get it all working nicely for your projects.
What does this Document provide?
We want to take the skirt from the preceding Create an Attachment guide and convert it into a fitted mesh skirt. We will mostly use the Fitted Mesh tools provided by Avastar 1.6.
However we also provide a lot of tool independent information as well. So this text may be interesting for you even when you do not use Avastar or Blender
We expect that you have basic knowledge about Blender.
The goal
and convert it into a Fitted mesh.
Some Gotchas
Fitted Mesh is nothing special
The concepts of fitted mesh are nothing unique to SecondLife. In fact Fitted Mesh is absolutely standard Skeletal Animation. The problem with Fitted Mesh is only its name (honestly).
Fitted Mesh does not Fit everywhere…
Some people believe that fitted mesh allows your mesh avatars to be adjusted perfectly to the SL system Avatar. But this is entirely not true. Fitted mesh does not fit to anything, and especially fitted mesh does not fit to the system Avatar at all. In fact Fitted Mesh is based on Skeletal Animation, while the SL Avatar shapes are mostly based on Morph Shapes.
The 2 concepts (Skeletal Animation and Morph shapes) are not comparable and thus they do not (actually they can not) create the same results. If you are lucky you can manage to create something that creates similar results, but never a perfect match for all Appearance Slider values!
Fitted Mesh with Joint Positions
If you try to upload a fitted Mesh with Joint Positions enabled in the SL Importer, then your imported mesh will be completely distorted. This is a Bug with the SL Importer. In simple words: You can not import a fitted mesh with joint positions.
This bug has been fixed in the Bento Project (currently in beta test). But we also found a temporary workaround for this:
No weights, no Fit!
The Avastar Tools for Fitted Mesh only work when your mesh is already weighted! The tools need existing weight maps on which they can operate. In general we recommend that the meshes are already weighted reasonably well for the classic bone set.
Sidenote: Actually you can start with no weights at all, but then the Fitting panel does no longer work smooth and easy. I will explain the issue in more detail further down.
Fitted mesh & Shades of Grey
Some people believe strongly that Fitted Mesh only uses the cBones (Collision Volume Bones), while Classic Mesh is a synonym for only weighting to the mBones (SL Base Bones). But this is not entirely true. Fitted Mesh weighting allows you to mix cBones and mBones. In fact our tools do just that to achieve better results.
Working with Fitted Mesh is no cakewalk
Should you expect that Avastar will give you the ability to create perfect rigged and fitted Mesh, then i can tell you 2 things:
- Yes you are right
- No, you won’t get there in one afternoon!
Honestly, Avastar only helps you to get better results with less work, but you still must know what you do. Please take your time, experiment a lot (even more than a lot), and learn 3D modelling and animation from the basics. All of this is not a cakewalk! But it becomes a lot of fun when you accept that it also is a lot of work:
The working Model
We will use a very simple skirt for this tutorial. This skirt is already weighted to the classic mBones and it contains a simple walk animation for scrubbing the timeline.
animated_skirt.blend
![]()
The above demo_model provided by Machinimatrix is licensed under a Creative Commons Attribution 4.0 International License.
For Second Life Users: We explicitly grant the permission to upload derived material to SL.
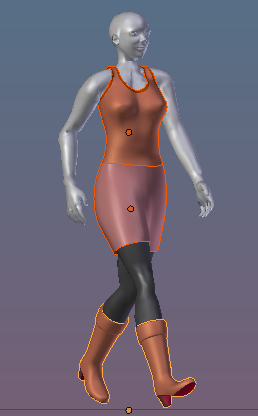
The skirt is available in animated_skirt.blend.
Starting from Classic Mesh
We use the very simple skirt model from the Create an attachment tutorial to demonstrate the basics of fitted Mesh. This skirt is already weighted to the classic mBones and it is rigged to a default Avastar character. We also added a simple walk animation (which was made with the Sparkles Addon ). So the blend file is “ready for take off” provided you have Avastar 1.6 installed.
Content of the Blend file
- A default female Avastar character
- A Weighted Skirt (See Create an Attachment)
- A Walk Animation for Testing
- Body textures (starlight from Elloh Elliot)
- Body Materials
- A very simple light setup
The Fitted Mesh Workspace
Your very first task is to setup your workspace so that it works best with the Fitted Mesh tools:
Preparing the Workspace
Preparations
The rigging Panel
- Select the Skirt inWeight Paint mode.
- Open the Avastar Tab in the Tool Shelf.
- In the Rigging Panel select the Pose Preset.
- Enable X-Ray.
- Optionally disable Limits and Shapes
- Optionally set the Rig display type to Stick.
- Enable the visibility only for the Deform Bones.
- And set the Display filter to “Map”.
Note: This is just my setup. You are free to use your own setup of course. But when you step through this document for the first time, then we strongly recommend to use the settings as indicated above.
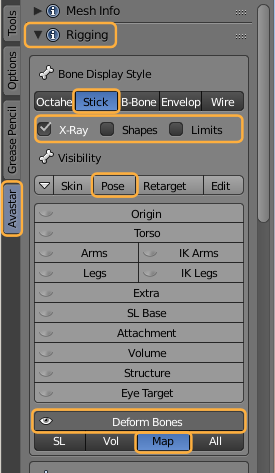
Recommended setting of the Rigging Panel
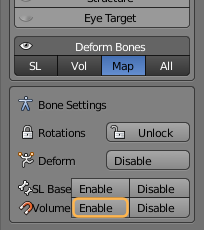
Configure the Deform Bones
By default only the 26 SL Base Bones of Avastar’s 136 Bones are enabled to use weight maps. All other bones are simply ignored by the Mesh attachments!
However Fitted mesh also uses the Collision Volume Bones for deforming. We have to ensure that the Collision Volume Bones are enabled as Deform Bones as well.
You do this in the Bone settings section at the bottom of the Rigging Panel (When your mesh is in Weight Paint mode). You click on the Enable button for the Volume Bones (see image)
Caveat: There is no visual feedback for what happens. This is a known issue on our list of improvements.
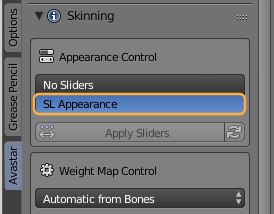
The Skinning Panel
Open the Skinning Panel and check that the Mesh has the SL Appearance Sliders enabled. Otherwise the Fitting tools won’t work. You do this in the Avastar Skinning panel in the Toolshelf (see image).
Hint: If you have trouble with the sliders, then often the problem goes away when you reset the Appearance Control to No sliders and then set it again to SL Appearance.
The Appearance Panel
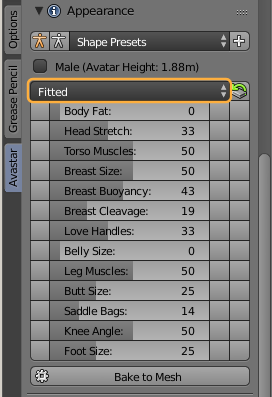
Open the Appearance Panel in the Tool Shelf and select the Fitted Section (see image). Now you can see all Appearance Sliders (13 in total) which are used by the Fitted Mesh System.Please keep the Appearance Panel open as we will use it frequently from now on.
The Fitting Panel
The Fitting panel contains all the tools that we have created to support Fitted mesh in Avastar 1.6. The video aside gives you a brief overview.
However i recommend that you also take a look at the following chapter about the Basics of Fitted mesh. This will certainly help you to understand how the tools operate, and how to use them efficiently.
Basics of Fitted Mesh
This page is about the principles of fitted Mesh. We strongly recommen that you first read this page before you attempt to go ahead and do practical work. However here are the links to the other pages on this topic:
The Nuts & Bolts
When we step into fitted mesh the situation gets a bit more complicated. Technically Fitted mesh is nothing special. It just makes use of a subset of the Skeleton, namely the set of Collision Volume Bones, where each Collision Volume Bone is clamped to a corresponding classic bone. Thus building tightly coupled Bone Pairs.
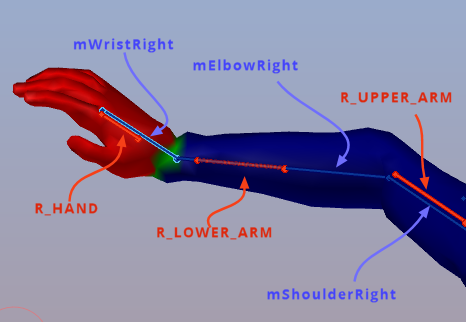
In the image aside you see for example the 3 bone pairs:
- R_HAND is clamped to mWristRight
- R_LOWER_ARM is clamped to mElbowRight
- R_UPPER_ARM is clamped to mShoulderRight
Fitting Bones
Due to the clamping the collision Volume always moves and rotates along with the bone to which it is clamped. With other words each bone pair [Collision Volume + Classic Bone] can be seen as one unbreakable unit. Lets name such a bone pair a FittingBone consisting of an mBone (a classical bone) and a cBone (a collision Volume).
When we look at classic Weighting then we only deal with the classic mBones. The cBones are completely ignored by the animation system and things are rather easy and well organized (left side of image).
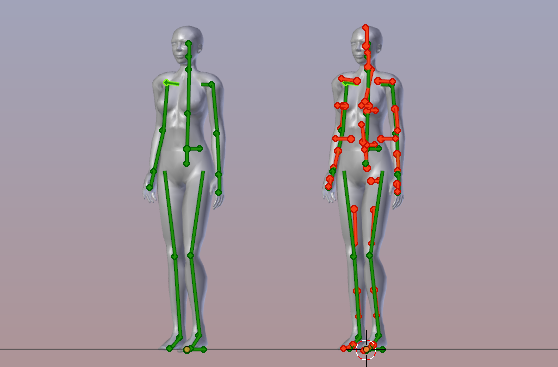
Left: regular Bones; Right: regular + cBones
For Fitted Mesh many users think they just need to replace the classic mBone weighting by the new cBone weighting, thus only use the cBones for fitted mesh. But this is not true. In general we have to deal with all cBones and all mBones at the same time when we make fitted mesh (right side of image)!
Animating Fitted mesh
Regarding the animation of your characters, it does not matter which bone of a FittingBone pair gets which weight:
- You could place all weight to the mBone
to get a pure classic weighting. - or you could place all weight on the cBone
to get “Fully Fitted Mesh” weighting, - or you can distribute the weight between
the 2 bones in any way you like.
In any case it is the weight sum of the Collision Volume and the corresponding classic Bone within a FittingBone pair that affects the animation, nothing else!
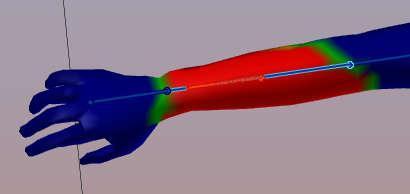
All weights on the mBone (Classic)
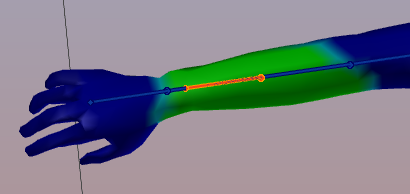
Weights distributed between mBone and cBone
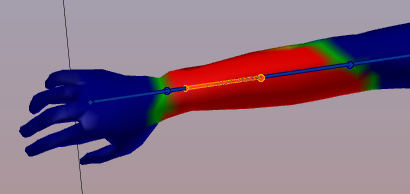
All weights on the cBone (fully Fitted)
The animation pitfall
Lets say your mesh is perfectly weighted to the classic bones. Now you want to convert this to fitted mesh. So you just add weight to the Collision Volume Bones and all is done…
But wait, when you add weight to a collision Volume, then the weight sum on your vertices raises above 1.0 (because you added weight) ops… Well, Blender is a bit clever here (and also a bit confusing for the user), it allows you to create weight sums > 1. But then it internally corrects the numbers by normalizing them before using them. Normalizing enforces that the weight sum is 1.0 again.
So what? All is well again, no?…
Well, you have added weight to the collision volume bone, right? But the weight sum must be kept at 1.
Hence this added weight must have been taken away from somewhere… So by adding weight to the cBone we reduce the weight on all other bones.
This is not an issue where you only have one single weight (the red zones in the images above). But wherever you already had 2 or more weights on classic bones, adding weight to a corresponding Collision volume most probably destroys your weights on the classic bones. And unfortunately this always happens near the joints.
Shaping Fitted Mesh
The Collision Volume Bones are used to add volume to your mesh. That is, the cBones provide a scale vector to make your mesh bigger or smaller depending on the amount of weight on the CollisionVolume Bone.
However you never “see” this vector anywhere. But you modify its value by using the Appearance Sliders. And as a result your mesh blows up or shrinks whenever a vertex is weighted to a collision volume bone AND the sliders are not in the neutral state.
Caveat: But all of this does not happen when your armature is in its default Shape (neutral shape) simply because there the scale vector is neutral.
Practical tip
When you want to do Fitted Mesh, then please select your Mesh, then step into the Avastar Skinning panel and ensure that your Mesh is set to ‘SL Appearance’
And then move the appearance sliders of interest out of the neutral setting. otherwise you can not see any change in your fitted mesh!

Weights on RIGHT_PEC, Breast Size appearance slider set to 0
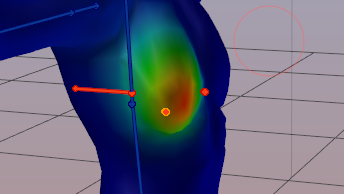
Weights on RIGHT_PEC, Breast Size appearance slider set to 50 (neutral)

Weights on RIGHT_PEC,
Breast Size appearance slider set to 100
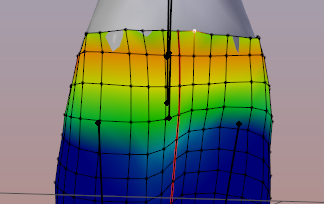
Weight Count for Fitted Mesh
We learned above that the FittingBones consist of bone pairs. So when we look at the joint of any 2 FittingBones we actually look at 4 bones (and not at 2 bones as in the classic weighting) Thus at the end you see that for Fitted mesh you typically need the double amount of weights on each vertex (weight the collision volumes for shaping, weight the classic bones for animating)
As a consequence a fitted mesh character does in general use 4 weights near the joints and 2 weights anywhere else.
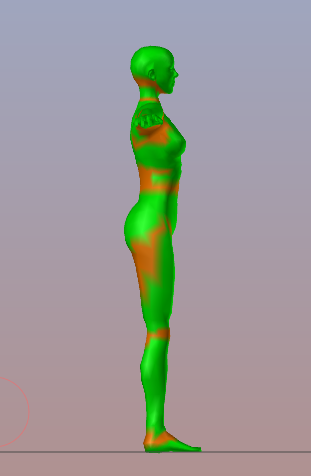
Green: 2 weights, Orange: 4 weights
The fitting Sliders
In the previous chapter we have introduced the Fitting Bones (bone pairs of one classic mBone and a corresponding cBone). In the fitting panel you find the corresponding tools for modifying the Fitting Bones. Especially you find the list of Fitting Bones in the Slider section at the bottom of the panel (see image)
Hint: The Fitting Panel is best used together with the Appearance panel. You should have both panels open and visible in the Tool Shelf.
The Fitting Panel details
Work in Practice
The video contains a complete fitting session. It also contains parts of what we have already discussed above. You may want to watch this video first and then return to the sections below for more details.
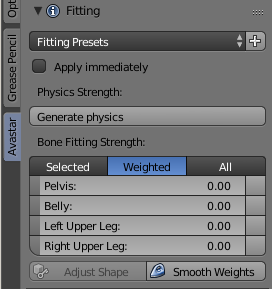
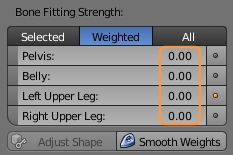
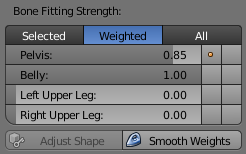
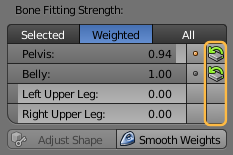
Bone Fitting Strength
At the top of the Slider section you find 3 filter buttons for resticting the Display to:
- The Selected Fitting Bones
- The Weighted Fitting Bones
- All Fitting Bones
The List of Fitting Bones
The settings controls which of the Fitting Bone sliders are shown in the slider list below the 3 filter buttons (see image). By default we display only the weighted Fitting Bones to avoid clutter on the display.
Distributing weights
The Fitting Sliders are used to move weight between the mBones and their corresponding cBones. Following rules apply for each slider:
- Slider value 0.0: only mBone weighted
- Slider value 1.0: only cBone weighted
- Any value in between: the weights are distributed between the mBbone and the cBone
In any case the sum of the weights is kept unchanged. Hence if a vertex is not weighted to a Fitting Bone, then moving the Fitting Slider will not generate any weight! However you can add weight to any vertex manually (by using the weight editor or a brush) and as soon as you do that, the added weight can also be distributed with the Fitting Sliders.
Fitting Bones in the 3D View
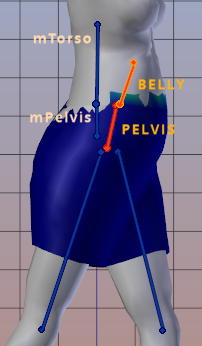
A Fitting Bone is always a pair of bones consisting of:
- an mBone (Classic SL Bone)
- a cBone (Collision Volume)
Remind that mBones are shown in Blue, while cBones are shown in orange.
Note:
A Fitting Bone is Selected when either its mBone or its cBone is selected.
A Fitting Bone is Weighted when either its mBone or its cBone is weighted.
The Fitting Bones in the 3D View
Note: If both bones of a Fitting Bone are weighted, then you see them both in the 3D View. Please refer to the Preparation section above to see how to customize the Bone Display.
Working with The Fitting Sliders
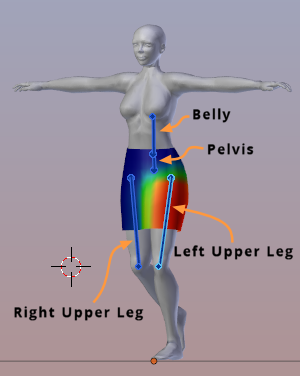
In the Fitting Slider section you see 4 Sliders associated to 4 bone pairs:
Collision Volume
BELLY
PELVIS
L_UPPER_LEG
R_UPPER_LEG
SL Base Bone
mTorso
mPelvis
mHipLeft
mHipRight
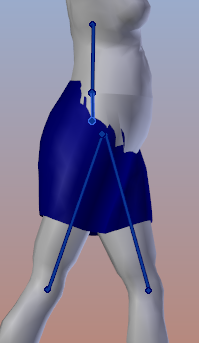
The Fitting Sliders for the Skirt
However when you look at the 3D View then you see only the blue mBones are currently displayed. This is because all Fitting Bone slider values are initially set to 0.0
Thus only the mBones are weighted, thus the mesh contains weight maps only for the classic mBones.
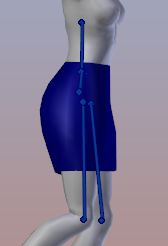
Initially only the mBones are visible
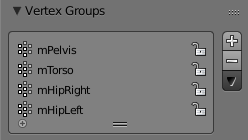
The Vertex Groups associated to the Mesh
Interactive Fitting
Now lets move the Pelvis Fitting Slider a bit to the right. You see the orange PELVIS Bone appears in the 3D View as well.
And also a new Vertex Group for the PELVIS bone has been automatically created in the Data Properties window.
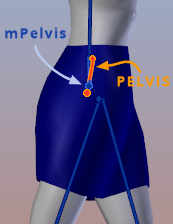
Sidenote: When a Fitting slider is set to 0.5 then all weights are equally split up between the mBone and the cBone.
The major Pitfalls
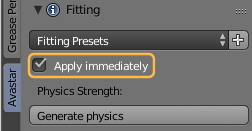
You may have realized that when you play with the Fitting sliders, then only the weight distribution gets changed, but the mesh itself does not change its shape at all. There are 3 reasons why this happens:
- your Appearance sliders are all in their default position (this is our issue here). You must move the Appearance Sliders out of their default positions when you want to see the influence of the fitting sliders on the Mesh Shape!
- You forgot to enable the Apply Immediately option in the Fitting Panel. Enable this option and try again.
- Your mesh is neither weighted to the cBone nor to the mBone of a Fitting Bone. In that case there is no weight to distribute! Hence the Fitting Bone slider has no effect at all.
Fitting the Pelvis
Lets now do some practical work with the dress.
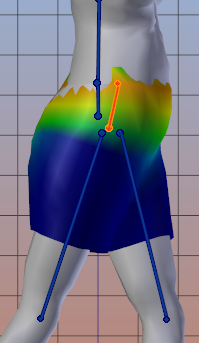
Please open the Appearance Panel (Torso Section) and move the Slider for the Belly Size to 50 (midway). You see on the image how the skirt sinks into the stomach (or how the stomach grows above the skirt).
Now step back into the Fitting Panel and move the Pelvis Fitting Slider gradually towards its maximum value. You see the belly growing with the Fitting Slider changes!
When the slider Value of the Pelvis Fitting Slider is close to 0.85 we see the mesh has changed like in the image aside. This is not perfect, but it is much better than it was before!
Note: You can easily get confused because the Fitting Panel and the Appearance Panel both seem to do something very similar. But always remember:
Now also move the Belly Slider from 0.0 up to 1.0:
You will end up with a slightly improved shape as shown in the image aside. However you still see issues on the side and on the back of the skirt where the original Avatar mesh pokes through.
Hint: The mTorso bone disappears as soon as the Belly Slider is set to 1.0
Belly: 1.0 Pelvis: 0.85
Fitting in Edit Mode
Luckily the fitting Sliders also work on vertex selections in Edit mode. All that you need to do is to set your mesh to edit mode. Now you can go ahead and select any subset of verts and then use the fitting sliders to improve the vertex locations of the selected verts. You can even select only one single vertex if you like.
Improved weighting by fitting selected vertices
Resetting the edited Vertex Weights
As soon as you begin using Fitting sliders in Edit mode, you notice that an additional icon appears on the right most column in the Fitting Sliders panel. When you click on this icon, then all weight edits that you have done in edit mode will be reset.
This is handy when you want to restart from a fresh and clean weight distribution
The revert icon on the right most column of Pelvis and Belly indicates edited weights.
Whenever the fitting slider values have been changed in edit mode, and when you switch back to weight paint mode, then moving the sliders may result in a change of the weight distribution of the entire mesh. This is a known inconvenience which we hopefully can resolve soon.
Current Workaround: Either readjust the Fitting slider or do not touch the fitting sliders in Weight paint mode after you have adjusted the weights in edit mode.
Fighting the Poke Through
Some areas of your mesh might suffer from poke through regardless how you distribute the the weights. In these areas your weights are not able to fit your mesh to the underlying Avatar mesh. However you can use a few strategies to master poke through issues.
- Use an Alpha Mask to hide the underlying Meshes (very recommended where applicable)
- Manually add weight to your weight maps (not recommended)
- Edit the Mesh itself to adjust it to the current Shape (good for small fixes)
- Create additional corrective Shape Keys (good when you intend to create standard sizes)
We will not get deeper into this topic here. We prepare a separate document for this.
Fitted Mesh and Joint Positions
When you try to import a Fitted mesh with Joint Positions, then you typically end up in a desaster. This is probably due to a bug in the Second Life Importer. Actually i have never found any Fitted Mesh example that can be imported to Second Life with Joint Positions.
However there is a workaround. The trick is to use 2 meshes where one mesh is only rigged to the classic mBones, while the other mesh includes the classic Bones and the Collision volumes (Fitted mesh bones)
Summary
I have introduced the principles of fitted mesh and the Avastar Fitted Mesh tools (i.e. the Fitting Panel). I have shown how you can work with the Fitting panel in Weight Paint Mode and in Edit mode.
From here on you can begin to experiment. Please be aware that nothing here is set in stone. Especially our workflow is not the only way how you can do fitted mesh. However i believe this is a good way to get you started.