First time users
My first steps with Avastar
You purchased Avastar and now you are eager to make awesome content. We understand you want to start seeing results in 5 minutes. So lets try to get there…
- I have purchased the Avastar and i found it in my Download folder
- I have successfully installed the Avastar
- I have checked out the Newbie page and i am eager to start.
All questions answered with yes? Then you are ready to take off…
My first steps
Watch the video and read the First Steps …
Appearance Sliders
We support the same appearance slider system as you can find in SL, OpenSim or other compatible worlds. You find the sliders in the Object properties of the Avastar Character:

Playing the Sliders
- Go to object mode.
- Select the Rig (RMB on the yellow circles).
- Open the Tool Shelf – Avastar Tab
- Here you find the Appearance Panel (see image).
- Use the sliders to modify your Shape as you like

Get more detailed from the Appearance Sliders Help page…
Mesh Clones
Important: In some cases you may want to modify the Avastar character beyond what you can do with the Avastar Shape Sliders:
- Create a tiny or a giant.
- Add extra shape beyond what you can do with sliders.
- Modify the Avastar Meshes into something totally different.
- Join the character parts to have one single mesh body
- …
The reason for this behavior is: Blender does not support editing Meshes which have Shape keys defined. The Avastar Meshes make heavy usage of Shape keys. Hence you get major fail as soon as you touch the meshes.
If you do not know what you are doing here, You have a good chance to break Avastar and create wild results:
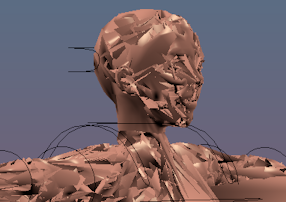
Unexpected results after small edits in the Avastar meshes
Create a Mesh Clone
- Go to Object Mode
- Select the Head (use Right Mouse Button, RMB)
- then SHIFT-RMB the Upper Body
and the Lower Body of the Avastar - Open the Tool Shelf – Avastar Tab
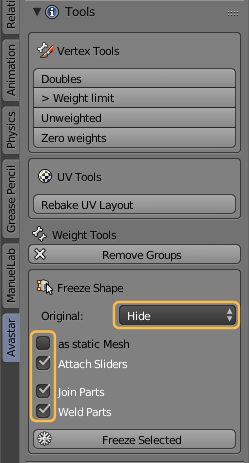
- Open the Tools Panel on the Avastar Tab
- Locate the Freeze Shape section
- Modify the options
- Disable Attach Sliders(*)
- Enable Join Parts
- EnableWeld Parts
- Freeze Selected
Now you have created a mesh Clone of the System character. You now can go ahead and modify and edit your mesh to your likes
Get more detailed from the Mesh Clones Workflow page…
Create a Pose (wip)
The art of Posing

Get more details from the Pose a character page…
Create an Animation (wip)
The art of Animation

Note: Avastar supports .bvh and .anim format. Both formats are fully supported by all major viewers for OpenSim and compatible online worlds.
Get more detailed from the Animate a character page…
More about Clothing and Attachments
Clothing (tbd)
…
Working with Avatar shapes (tbd)
…
About Standard Sizes (tbd)
…
Accessories (tbd)
…
Making Rigid Attachments (tbd)
…
More about creating Characters
Creatures (tbd)
Quadrupeds, Centaurs and more
Add bumps and wiggles (Avatar Physics) (tbd)
…
Making Animations
Working with Bone constraints
Bone Constraints (Available in Pose mode and Edit mode)
The Avastar Rig tries to keep most of its complexity under the covers. The most important and unfrtunately also the least understood part of the rig is its control bone section together with its set of Bone constraints. Here is a bit of information to shed some light on this.
The (green) Control Bones and the (blue) SL Base Bones of the Avastar rig are closely related to each other. Actually the SL Base Bones by default inherit the control Bones Transformation matrices. Hence the control bone skeleton and the SL Base bone skeleton are like almost perfectly synchronized twins. You can see this best with Bone display mode set to Octahedral:
The Green Control Bones are the master bones used for Animation
The SL Base Bones are used for Skinning (Weighting). They follow the green control bones
However there are 2 situations where you want to change the default behavior:
- When you Skin your Mesh (When you do weight painting tasks) then you almost always want to unlock the Bone Rotations of the Blue SL Base Bones. Then you are free to pose the Deform bones for testing purposes.
- When you Animate your Character, then you may want to unlock the Location Constraints of the Green Control bones, so that you can also perform Location animations.
Bone Constraints Panel (in Edit/Pose Mode)
- Bone Constraints Selector: Here you can specify if you want to affect
- All Pose Bones
- All Visible Pose Bones
- All Selected Pose Bones
- SL Bone Rot: Lock/Unlock the rotation of the SL Base Bones (good for weighting tasks)
- Control Bone Loc: Lock/Unlock the Location of the Control Bones (good for special animations i.e. face animation)
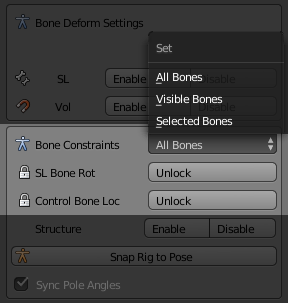
Note: The Bone Workflow Presets (see further above) take this into account. So when you select the Skin preset, then the constraints are automatically set appropriate for the Weighting workflow.xxx
Import a bvh file to Avastar (tbd)
…
Advanced
Arbitrary Rest Poses (tbd)
…
Fitted Mesh (tbd)
…
Working with Joint positions (tbd)
…
Expert tools
Exporting to other tools (tbd)
…
Working with Developer kits (tbd)
Working with Developer kits
Adding Avastar Presets (tbd)
…
Clean Reinstall (tbd)
…