Purpose
You may want to modify the Avastar meshes, or just create posed static versions of the Avastar meshes. The workflows below help you to Quickly create a Mesh based clone of the SL Avatar.
Good to know
Important: In some cases you may want to modify the Avastar character beyond what you can do with the Avastar Shape Sliders:
- Create a tiny or a giant.
- Add extra shape beyond what you can do with sliders.
- Modify the Avastar Meshes into something totally different.
- Join the character parts to have one single mesh body
- …
The reason for this behavior is: Blender does not support editing Meshes which have Shape keys defined. The Avastar Meshes make heavy usage of Shape keys. Hence you get major fail as soon as you touch the meshes.
If you do not know what you are doing here, You have a good chance to break Avastar and create wild results:
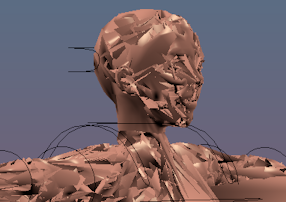
Unexpected results after small edits in the Avastar meshes
Workflow
This is the most basic process of creating a simple character mesh based on the SL Avatar mesh
Step 1: Create a new Avastar
In Blender
Navigate to:
add -> Avastar -> With Triangles
The Avastar character is based on the
SL Avatar definition files
from Linden Lab.
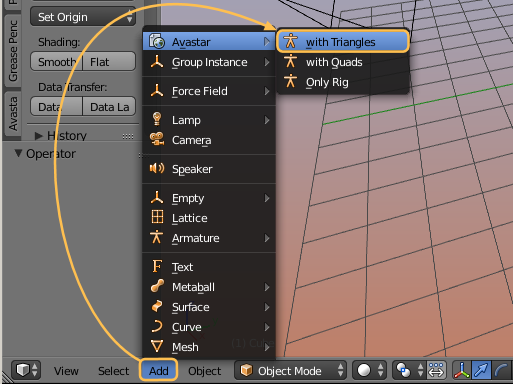
Create as new Avastar
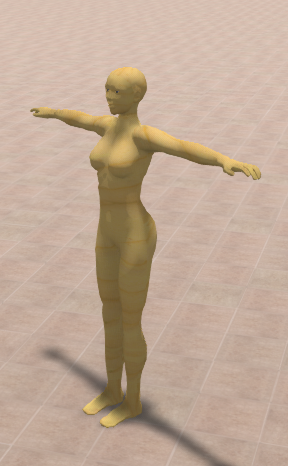
After a short time (typically 2-4 secs) a new Avastar character is created in the 3D View and at the current 3D cursor location .

Avastar’s default Shape is compatible with SL’s default Shape.
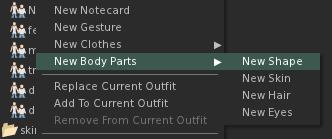
Back in Second Life
When you use Avastar’s default shape then you also need to test your work with a fresh created shape in SL.
The SL default Shape (Create new Shape).
In SL you create the default shape from your Inventory: (See image)
What else you should know
- New Avastar characters can only be created when you are in Object Mode!
- A new character will be placed at the current 3D Cursor location.
- You can hide (‘h’) or remove (‘x’) not needed parts of the Avatar meshes (like the skirt or the hair for example) without breaking the tools.
- You can create as many characters as you like aside each other and so you can create multi-character animations.
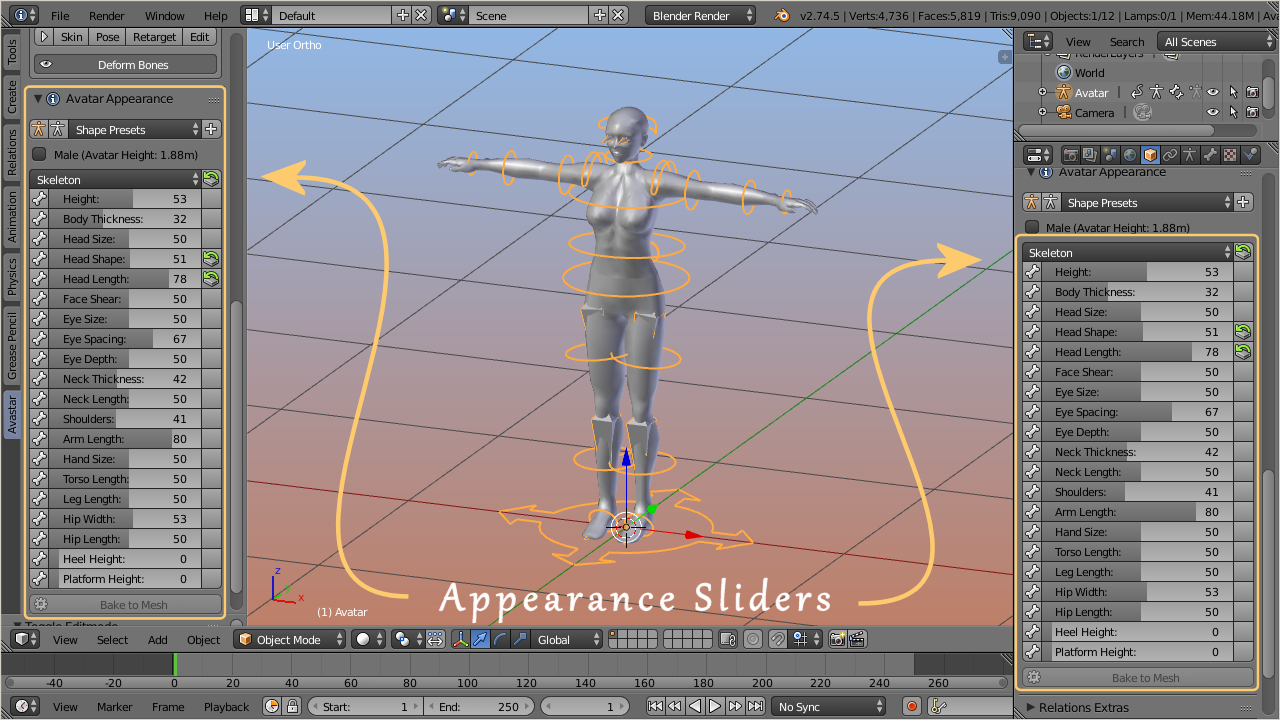
Step 2a (optional): Use Appearance Sliders
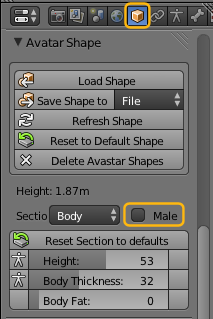
The Appearance Sliders

We support the same appearance slider system as you can find in SL, OpenSim or other compatible worlds. You find the sliders in the Object properties of the Avastar Character:
- Go to object mode.
- Select the Rig (RMB on the yellow circles around the mesh).
- Open the Tool Shelf – Avastar Tab
- Here you find the Appearance Panel (see image).

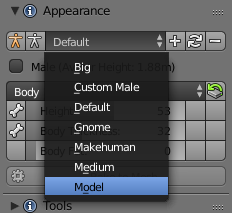
- Shape Presets: Here you can add your own Slider configurations. When you click the white + sign the current shape slider values get stored as new Preset (see also below).
- Orange Stickman: Reset the Shape to the SL Default Shape (like create new Appearance)
- White Stickman: Reset the Shape to the SL technical Rest pose (may be useful when you bind to a mesh that used the default SL Skeleton (like workbench or avatar.blend)
- Male: When enabled, the Shape switches to Male gender. The current absolute Avatar Height is displayed in parantheses)
- Sections: A popup Menu for the different Shape Sections (In the Image the Body Section is displayed). This is equal to the Appearance Editor in SL or OpenSim.
- Section Reset: The icon on the right side of the Section Selector allows to reset the entire Section to its Default values.
The Shape Presets Selector
The Preset Selector can be used to store your custom Shapes. For example when you attempt to work with a fixed set of Standard Shapes, you can add these shapes as Presets: All you need to do is:
- Define your shape (by moving the Shape Sliders, see below)
- Create a new Preset
The Section Sliders
The section subpanel of the Avatar shapes panel contains the Sliders for the section specific shape keys. The values assigned in SL match exactly with the slider values in Blender.
- Some sliders have a small Bone icon on their left side. This indicates the slider affects the bones (bone sliders).
- Some sliders have a small magnet icon on their left side. This indicates the sliders affects a fitted Mesh bone (Collision Volume bone)
- All other sliders affect only the mesh (morph sliders).
- The icons on the right side indicate that the slider value has been changed. Click on these icons to reset the corresponding Slider Value to its default.
- Note: The Reset icon on the Top Right of the section panel resets the entire Bone Section to its Default Values.
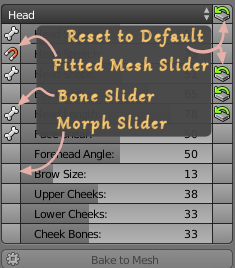
Fitted Mesh Sliders indicated with a magnet
The Special Sections
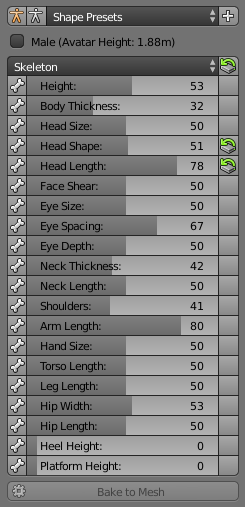
- We have added 3 extra sections (Changed, Fitted and Skeleton) which do not appear in the Second Life Shape editor.
- The Changed section is empty by default and will be populated by the list of changed Shape sliders of your Avastar.
- The Fitted Section contains all Sliders which affect Fitted Mesh Bones (Collision Volume Bones).
- The Skeleton section (see image) contains all sliders which affect the bone length of the Avastar character.
- On top of the list (in the Section Header) you see a Reset button. This button will reset all shape sliders of the current Section to its factory defaults.
- Each slider can be dragged, or you can click on it and then type in a number.
- If a slider has been changed then you see a reset icon right to the slider. Clicking on that icon resets the slider to its default value.
Bake to Mesh:
This function makes all slider changes permanent for the active (and selected) Custom Mesh. Take care: This function deletes all Custom Shape keys and the Mesh gets changed!
Hint: This option is not available (greyed out) for the Avastar Meshes.
Special Feature: The Mesh deformer
The Mesh deformer is an old development that came to live a couple of years ago. But the project has never been going public in Second Life. However we keep basic support for the Mesh deformer available, because other compatible online worlds might possibly support the Mesh deformer.
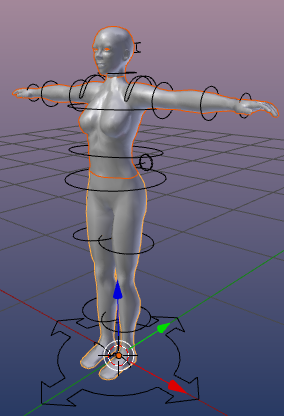
Step 2b (optional): Change Gender
You can change the Gender of the Avastar character as follows:
- Select the Avastar Armature
- Open the Data Properties Tab in the Properties window:
- locate the Gender Selector and enable “Male”
Your final result will look like this: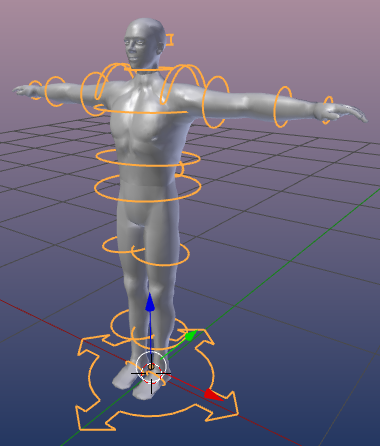
Note: You can switch the Gender on and off as you like.
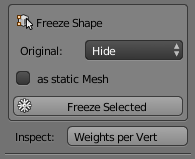
Step 3: Freeze your Shape
Freeze Shape
Purpose
The Avastar Meshes can not be modified. As soon as you try to do this, you will get very bad distortions. This is due to how Shape keys are handled in Blender.
The freeze either creates static meshes from your rigged meshes, or modifiable versions of your selected meshes. The tool basically removes all shape keys and all Avastar control data.
The Freeze Tool is used in following situations:
Usage
- Ensure Blender is in Object Mode.
- Select all parts which you want to freeze.
- Set the freeze options.
- Freeze Selected.
Details
Select all parts of the Avastar meshes which you want to use for your own character:
Here i have selected the Head, the upper body and the lower body
Then set the Freeze Options, and finally Freeze Selected:
Note: The frozen Meshes do no longer react in the exact same way to the Avastar sliders as the original Avastar character does. However, the meshes behave exactly in the same way as they will behave when imported into SL, OpenSim or other compatible virtual environments.
What you should know
- When you select to Keep the Original, then the original mesh and your frozen mesh will overlap and you might not be able to see that there are actually 2 meshes now.
- When you select to Delete the Original, then the Original Avastar mesh is fully replaced by your frozen version.
- When you select to Hide the original, then the Original Avastar mesh will be hidden from view, then you only see the frozen version.
- when you enable Standalone Posed then your frozen mesh will be detached from the armature and it will end up as a simple non rigged static mesh.
- When you enable Remove Weight Groups then all weight groups of the frozen mesh will be deleted and you end up with a static non rigged mesh without any weights associated to it. (A naked model so to say)
The Tool Options
Original:
This option defines what shall happen with the original Mesh(es) (those which you have selected in Object mode)
Values:
- Delete: The Original Mesh is deleted.
- Hide: The Original mesh is kept but gets hidden. You can always unhide hidden objects with the keyboard shortcut ALT + H
- Keep: The Original Mesh is kept and remains visible. Thus the original and the new copy are displayed at the same time
As static Mesh:
If the original Mesh was rigged to an armature, then -by default- the frozen mesh Copies keep rigged as well. But sometimes you want to get a complete static statue with no animation information at all. In this case you will select this option.
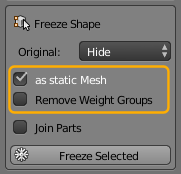
Note: If you select this option you get an additional option Remove Weight Groups which does what the name implies. Hence you can achieve that the frozen object contains no animation data at all (this option is rarely used, but very handy when needed)
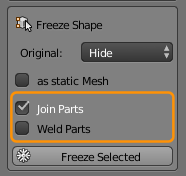
Join Parts:
If you have selected 2 or more objects, then the Join Parts appears. This option just joins the frozen parts into one resulting mesh object.
Note: If the Join parts option is selected, then you get one more option Weld Parts. If that option is checked, then all duplicate vertices along the adjacent edges of the joined parts will be merged.
Step 4: Join Parts (Optional)
Join Avatar Parts
Joining parts of a mesh will make all parts belong to one single object.
- Select all objects that you want to join. Here i have selected the Head, the upper body and the lower body of a frozen version of the Avastar character:
Note: You can select multiple objects by holding the SHIFT key down while you right click on the parts which you want to select.
- Press CTRL +J to join the parts into one object
What you should know
You might have duplicate vertices especially along the seams of the meshes. You can remove these duplicates as follows:
- Go to Edit Mode
- Select all Vertices (press “A” once or twice)
- Press “W”
- Select the “Remove Doubles” function
- Go back to Object Mode
Your final result will look like this:
